Monday, May 28, 2012

Word Wheels

The students read the words that are formed when the letter is next to the word ending.  They then write the word on the paper.  With these writing activities I model for the students how to write the words correctly on the lines.
I found these word wheels at Montessori Print Shop.
ABC Teach also has printable word wheels

Teen Board

The teen board has 2 slotted columns of the number 10 and 1-9 number cards.  I point to the top 10 and have the student name it.  I point to each slot and have them name each 10.  I then showed the student a ten bead and had them count the beads.  They then put the ten bead by the number 10.  They continue this until each number 10 has a ten bead next to it.  I place the one bead next to the first ten bead and have the student count the beads.  I then place the number 1 in the slot and say, "ten and one together make eleven."  I then place the two bead next to the next ten bead and have them count the beads.  I place the number 2 in the slot and say, "ten and two make twelve."  I continue the same way with the rest of the numbers.

In this picture I named a teen number and the student had to make it with the number and with the beads.   I also have teen number cards that the students lay out next to the ten slots and then they have to make that number on the board and with the beads.
Montessori Materials has printable teen boards.
Homemade Montessori shows how to make a teen board.

Butterfly Blot Painting

I pre-cut butterfly shapes and folded them in half.  I presented to the students how to paint on the left side of the cutout then fold the cutout and press on the back.  They then opened the cutout to see that their design is now on both sides of their butterfly.

Journals

Here is a journal entry from a young 4-year-old.  He drew his picture and then dictated to the teacher.  The teacher wrote his words on the opposite page in yellow marker.  He then traces the yellow.  This helps him practice holding the pencil and the correct way to form the letters.  It also teaches him left to right and top to bottom order of writing.

This journal entry is from a 5-year-old student.  He drew his picture and dictated to the teacher.  Instead of the teacher writing his words in yellow she drew lines for each word.  The student then had to write the words on his own on the lines.  If the word was one of his sight words he had to spell them correctly by looking in his sight word book.  Otherwise he had to spell them phonetically by sounding out the word.
 

This journal entry is also done by a 5-year-old student.  He drew his picture and then wrote the words on his own.

I usually do journals on Fridays and those students that don't attend school on Friday do their journals on Thursdays.  But as the end of the school year approached the students had been asking to do their journals more often.  I wasn't going to argue.

Pink Material Picture/Word Match

Once a student has learned all of the letter sounds I start to have them blend the sounds to form words.  I set out the letters s, a, and t from the moveable alphabet and then say the sounds /s/-/a/-/t/ while pointing to each letter.  I say it again a little faster and then again even faster.  Then I say the word.  I put out three new letters and have the student try.  When they have begun to blend letter sounds to make words I show them this work.  I put the word cards on the left side of the rug and the large card with the pictures on the right side of the rug.  I name the pictures.  I then say the sounds of the letters on the first card.  I then say the picture name.  If it doesn't sound the same, I move on to the next picture name and repeat the letter sounds and the picture name.  Example: first card says net; I say /n/-/e/-/t/ mat and shake my head no.  Then I say /n/-/e/-/t/ bed and shake my head no.  /n/-/e/-/t/ net and shake my head yes and place the word card under the picture.  I do one more and then have the student try.

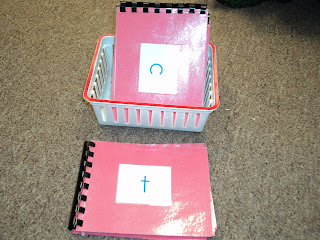
 This photo shows my storage system for the pink material picture/word match cards.  I taped an envelope to the back of the card.  Then I mark the envelope and each card with a colored dot.  This card is red so the envelope has a red dot and all the word cards that go with that group have red dots.
The cards that I have in my classroom are from our North American Montessori Center teacher training manual but you can find printables like this at the following websites or you could easily make your own:

Tuesday, May 22, 2012

Quotes From Maria Montessori

"The best instruction is that which uses the least words sufficient for the task.  The fewer the words, the more perfect will be the lesson." Dr. Maria Montessori from Discovery of the Child, p. 106

"Education... is acquired not by listening to words but by experiences upon the enviroment."  Dr. Maria Montessori from Ed. For a New World, p. 36 -37

Saturday, May 12, 2012

Seed Sorting

The students use the tongs to pick up the beans/seeds and sort them by seed type.  Some of the seeds are similar so they have to pay close attention to details.  This work strengthens their fine motor skills needed for writing.
This is how the work is set up n the shelf.

Felt Continents


I traced pieces from the world map puzzle onto felt.  The 2 big blue circles that represent the hemispheres are made out of stiff felt.  The students use the control map to put the pieces in their correct places and then label the continents with name cards.  The students really enjoy this work because they like to be able to feel each piece.  We also sing Dr. Jean's "Continents" song

Monday, May 7, 2012

ABC Tubes

I have filled these baby soda bottle test tubes that I got from Steve Spangler Science with items that begin with each letter of the alphabet.  I have the students put the letters in alphabetical order and then they have to match the tubes with the correct beginning sound of the item in the tube.  I have also included cards with the letter and the object so they can check their work when they are done.  The students really love this activity at any age.  I have the younger students just match the letter and tube to the card.
a: ant
b: buttons
c: cotton
d: dice
e: erasers (I had a very hard time finding objects that started with the short vowel sounds that would fit into the tubes)
f: feather
g: glitter
h: foam hearts
i: iguana
j: jelly beans
k: keys
l: leaf
m: marbles
n: noodles
o: oatmeal
p: paper clips
q: Q-tips
r: rocks
s: sand
t: telephone
u: umbrellas (I used the drink umbrellas)
v: velcro
w: water
x: x-ray
y: yellow yarn
z: zipper

Sunday, May 6, 2012

Sound Books

I use the Three Period Lesson to introduce letter sounds to my students:   
1. I show them the sand paper letter and say the sound (not the letter name).  I then trace the letter and say the sound. 
2. I have them trace the letter and say the sound
3. I have them tell me what the letter sound is. 
If they can tell me the letter sound I write the letter in their sound book.  If they have trouble remembering what the letter is we do the three period lesson again.

When we meet to do sounds again we will review the letters in their sound books.  If they don't remember a letter sound then I fold the corner of the page and we will review the sound with the sand paper letters.  If they know all the sounds in their books then we will add a new letter.

This is the order that I introduce the letters: a, s, m, e, t, c, o, p, u, d, f, j, g, l, b, i, n, w, r, h, y, q, z, k, v, x.


Here is a link to google docs for a template for the sound book covers: Sound Book Covers

To help the students hear the letter sounds in words I made these letter sound books.  In each book there are pictures of objects that begin with those letters.  I grouped 6-7 letters together and color coded them so they would be easier to organize.  The first six letters a, s, m, e, t, and c are red and are stored in the red basket.  I couldn't find different color baskets like what I wanted so I used white plastic baskets and used a Sharpie to color the edge.  The students then can place them into the correct basket when they are done.

When saying the name of the object on the page I say the beginning sound 2 times and then say the name that way they can hear the beginning sound clearly.  Example: /t/, /t/, turtle
 This is how the books are stored on the language arts shelf.
 The baskets in front of the books have sound sorting cards.

My Montessori Journey: Montessori-Language has great ideas for introducing sound books

Saturday, May 5, 2012

Montessori Guide

Montessori AMI Primary Guide is a great website that gives a step-by-step guide to using Montessori materials with explainations as to why the materials are important to the students. 

Metal Insets

Using metal insets gives the students an opportunity to strengthen their eye hand coordination, fine motor and writing skills.  As the students trace the insets they are learning how to properly hold a pencil and how to apply proper pressure when using a pencil.  The student places a metal inset paper onto the tray and places the inset over the paper.  They then trace the inset and color it in before removing inset.  An extension to this work is to have the students write the name of the shape at the bottom of the page and then staple all the pages together to make a shape book.

Here you can see that the student colored in the shape and then labeled the shapes.  When she was done she stapled the pages together.

This is how the metal insets are displayed on the shelf.  We only have on set out at a time and we switch them periodically to help keep their interest in using them.  We also show them how to use the different shapes to make things like Easter eggs, Christmas trees, flowers, balloons, etc.

The Montessori At Home With Love blog has some great info about metal insets http://montessori-in-the-home.blogspot.com/

Here is a link to a printout that you can use if you would like to make your own metal insets http://www.montessorimaterials.org/Language/metalInsets.pdf

Discovery Days and Montessori Moments also have some different ways to use the metal insets http://discoverydaysandmontessorimoments.blogspot.com/2012/01/montessori-essentials-metal-insets.html

Pink Word Lists

This pink word list is from the NAMC Early Childhood Language Arts Teacher Training Manual.  You can create your own by making a list of CVC (consonant-vowel-consonat) words.  The students sound out the letters and read the words.  Montessori Print Shop has pink word lists http://www.shop.montessoriprintshop.com/Pink-Word-Lists-LF-1c.htm.  Homemade Montessori also has some word lists and other pink materials to print http://homemademontessori.blogspot.com/2008/10/pink-series-word-lists-pictures-and.html

As an extension I have the students write the words on a word paper so they can practice handwriting and then they are able to take the word list home so they can read the words to their families.

Sorting Money

The teacher presents this work by showing each coin, naming each coin and talking about the different characteristics of each coin.  The students then feel each coin and observe the differences.  Then they sort the coins into different sections of this five part tray (found at Dollar Tree).

Brown Stairs and Pink Tower Extensions


Here one of my students is building an extension with the pink tower and the brown stair.  He used some picture cards that we printed out from our Montessori classroom guide book.  But you could get extension cards from The Montessori Print Shop http://www.shop.montessoriprintshop.com/Pink-Tower-Broad-Stair-Pattern-Cards-Set-1-SenF-8.htm


Here is a blog that shows pictures of some brown stair and pink tower extensions http://montessoristory.blogspot.com/2012/01/free-pink-towerbrown-stair-extensions.html

Knobless Cylinders

The knobless cylinders are a sensorial work that teaches the students to recognize similarities and differences in sizes and to strengthen their eye hand coordination.  The Montessori Print Shop website has some printable extension cards to use with this work http://www.shop.montessoriprintshop.com/Knobless-Cylinder-Pattern-Cards-1-SenF-1.htm.  The Work Plan blog also has some great ideas for knobless cylinder extensions http://www.theworkplan.blogspot.com/2011/04/knobless-cylinders-extensions.html

Moveable Alphabet

The students use the moveable alphabet to phonetically spell words.  I don't correct the students when the words are not spelled right unless it is a CVC (consonant-vowel-consonant) word.  The cards that are being used in this picture are from Lakeshore.  The words are printed on the back so they can self check if they would like.

Butterfly Life Cycle

We sang a song about the butterfly life cycle during line time.  The students then made their own paper plate butterfly life cycle.  I used pictures that I got from abcteach.com as a member.  I used a black marker to draw a line around each picture so the students could cut them out a little easier.  I placed this sample above the science shelf for them to reference and to check their work when done.


The Butterfly Song
(sung to the tune of "Up on the Housetop")

First comes the butterfly and lays an egg,
Out comes caterpiller with many legs,
Oh see the caterpillar spin and spin,
A little chrysalis to sleep in.

Oh, oh, oh, wait and see
Out of the chrysalis, my oh my,
Out comes a beautiful butterfly.

We also have a basket on the science shelf with the butterfly life cyle objects and cards and label to match.  The cards and labels are available at Homemade Montessori http://homemademontessori.blogspot.com/2008/10/life-cycle-cards-for-butterfly-frog.html

We ordered caterpillars from http://www.insectlore.com/ so that we could observe the life cycle first hand.  The students love checking on the caterpillars each day to see how they have changed.


Friday, May 4, 2012

Parts of a Plant

While working for a school district a few years ago I had access to an overhead projector.  I am not sure where I got the worksheet for this poster but you could use any drawing.  The students are able to label the pictures.  We also sing a song about the parts of the plants and we point to the poster as we sing.  The song is "Parts of a Flower" from Dr. Jean's "Kiss Your Brain" CD http://www.drjean.org/html/cds_f/cds_kiss.html I am also going to use felt to make a parts of the plant work so the students can manipulate the parts and label them on their own.  I found a website that shows students using playdough to make the parts of a plant http://www.hummingbirded.com/spring.html

Seeds in a Bag

We planted seeds in a bag in order to show the students how seeds grow and to better see all the parts of a plant.  Before having the students plant their seeds I placed a paper towel inside a sandwich size ziploc bag.  I then put a line of staples about an inch from the top of the bag to keep the seeds from falling into the water.  The students then placed 3 beans into the bag and poured 3 tbs of water into the bag.  I taped them onto the window.

The bottom row of bags are labeled "no water" and "no air" so the students could see that seeds need air and water to grow.
Here you can see the seed growing.  We talked about the different parts of the plant: roots, stem, leaves.

A Seed Needs . . .

During line time, I talked with the students about what seeds need in order to grow.  I then presented this activity to them.  I pre-folded the paper in half long ways and short ways so the fold lines made 4 boxes.  Then I showed them how to draw a line on the fold lines.  I then cut the sentence labels and glued one into each box and drew a picture to go with each label.
This is how the work is placed on the science shelf.

Here is a picture of the finished sample that I made.  I then hung it on the wall above the science shelf so the students could reference it while working.

Getting Started

As I am about to wrap up my 2nd year of teaching in a montessori classroom I decided to start a montessori blog as a way for me to look back at what I did each month in the classroom.  I started realizing as the months went by that it was hard to remember what I did each month for each area of the classroom.  So to add to my already hectic life of raising a 6-year-old and a 6-month-old I decided to start a blog as a way to remember and also so others could get some ideas from me.  I hope you are able to get some inspiration from my photos and posts.